CTS Extension - Working with Projections
back to Index page
Edgar Soldin's CTS extension allows the user to assign a coordinate reference system to vector and raster layers and reproject accordingly. The CTS extension is based on the Geotools library and uses the well known text( EPSG WKT ) specifications. The database resides within the text file CS.CONF, and the CTS extension comes with a sample CS.CONF file with the german Gauss-Kruger coordinate systems.
The CTS extension does not allow file re-projection of a layer on-the-fly, however, if properly configured, it enables the user to define a projection of one or more layers, and re-project these to other reference systems.
To configure the CTS extension:
- Install the CTS extension within OpenJUMP.
- Modify, or create a new CS.CONF file for the desired transformation(s)
- Use the CTS extension with OpenJUMP
Setup
To use the CTS extension correctly, OpenJUMP has to be installed in a special way.
- 1 - move your OpenJUMP folder to a root folder (e.g. C:/OpenJUMP) or in a folder which *must not* have space characters (" ") in the name (e.g., in MS Windows,
BAD: C:/Program Files/Openjump.
GOOD: C:/Programs/Openjump or C:/Openjump)
Note: This is to workaround a bug which leads to a Nullpointerexception in WKTCSLoader, further described under Installing Plugins.
- 2 - Download the CTS extension file and unzip it in OpenJUMP/LIB/EXT folder (you must create an EXT folder if it doesn't exist). In the zip file there is also a small mini manual written by Edgar Soldin where you can find some basic information on the use of the plug-in.
- 3 - You will see that a CS.CONF file is included in files extracted from the zip file. This files represents the source of the coordinate reference system definitions that can be used with the plug-in. This file has only WGS84 and GAUSS-KRUGER codes (Germany) by default. Additional CTS definitions for your area of interest will need to be added to the file.
- 4 MAC User: Move Openjump to a root folder, you should also move the cs.conf into the $JUMP_HOME/conf/ folder to solve anyNullpointerexception error
How to find EPSG WKT code
Writing a new CS.CONF file is not complicated. It is a simple text file which can be opened and edited with a text editor like Windows Notepad. When you open the initial CS.CONF file you will see the EPSG codes are repeated twice(#PROGJ..., PROGJ..). These first lines are commented out and can safely be deleted. (Comments in the file are lines that start with the "#" character.)
To avoid confusion, clean up all the lines and start to write a new CS.CONF file. (Make a back-up file before any modifications).
Before writing a new file you must know two important things:
- The EPSG codes use a WKT to define a coordinate reference system. This string has to be entered in the CS.CONF file
- For some CRS (=Coordinate reference sysrtem), the EPSG code has to be modified with a transformation of the projection to WGS84 (World Geodetic System 84). This modification can be of 2 types:
- 3-parameters transformation (translation along X, Y and Z axis). This case might happen between NAD27 and WGS84 projections in USA or Canada
- 7-parameters (Bursa Wolf) transformation, a modification of Helmert transformation, where, together with the 3 translations of axis, there are also 3 rotations along the axes and a scale difference. This case happens frequently in Europe between older projections, like GAUSS-BOAGA or GAUSS-KRUGER, and WGS84.
This transformation is expressed by the string TOWGS84 in the EPSG WKT code.
The following example shows how to define a correct EPSG WKT code to use with OpenJUMP's CTS extension.
Example
(Adapted from Moovida's blogpost "how-to-find-and-use-bursa-wolf" from JGRASS Tech Tips)
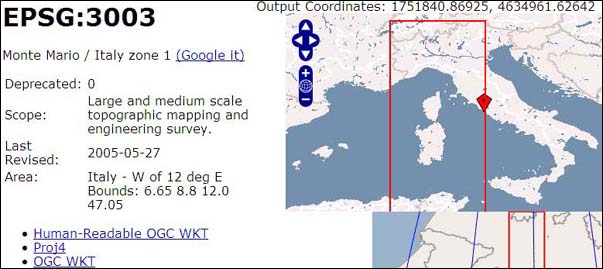
I will write a CS.CONF file with some Italian CRSs. First I write the EPSG WKT code for EPSG 3003, which is a code name attributed by "European Petroleum Survey Group" (EPSG) to the Monte Mario/zone 1 (known in Italy also as Gauss-Boaga zone est). This CRS adopts the International Ellisoid 1924 (Hayford), then I correct the EPSG WKT code with Bursa Wolf parameters. Then I will repeat the same work for other CRS.
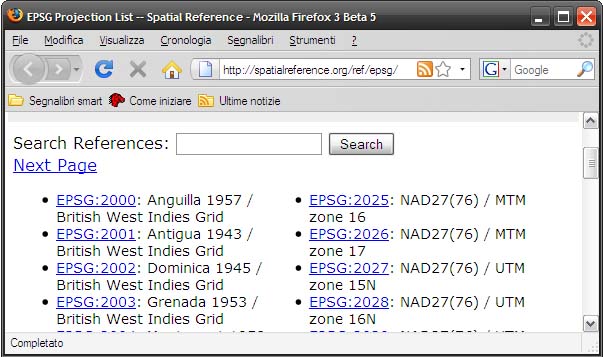
I) To find EPSG WKT , I go to EPSG database (created by Howard Butler and Christopher Schmidt) and search the CRS with the code 3003 (I write 3003 on Search reference box & click the Search tab).
II) The new window will show all the information related to EPSG 3003, the area of usage, on the right, and the different WKT codes below.
Click on OCG WKT format to see the code:
PROJCS["Monte Mario / Italy zone 1",GEOGCS["Monte Mario",DATUM["Monte_Mario",
SPHEROID["International 1924",6378388,297, AUTHORITY["EPSG","7022"]],
AUTHORITY["EPSG","6265"]],
PRIMEM["Greenwich",0,
AUTHORITY["EPSG","8901"]],
UNIT["degree",0.01745329251994328,
AUTHORITY["EPSG","9122"]],
AUTHORITY["EPSG","4265"]],
UNIT["metre",1,
AUTHORITY["EPSG","9001"]],
PROJECTION["Transverse_Mercator"],
PARAMETER["latitude_of_origin",0],
PARAMETER["central_meridian",9],
PARAMETER["scale_factor",0.9996],
PARAMETER["false_easting",1500000],
PARAMETER["false_northing",0],
AUTHORITY["EPSG","3003"]]
Create te a new TEXT file, called CS.TXT , and Copy the OCG code in it; without any breaks, as below:
PROJCS["Monte Mario / Italy zone 1",GEOGCS["Monte Mario",DATUM["Monte_Mario",SPHEROID["International 1924",6378388,297, AUTHORITY["EPSG","7022"]],AUTHORITY["EPSG","6265"]],PRIMEM["Greenwich",0,AUTHORITY["EPSG","8901"]],UNIT["degree",0.01745329251994328,AUTHORITY["EPSG","9122"]],AUTHORITY["EPSG","4265"]],UNIT["metre",1,AUTHORITY["EPSG","9001"]],PROJECTION["Transverse_Mercator"],PARAMETER["latitude_of_origin",0],PARAMETER["central_meridian",9],PARAMETER["scale_factor",0.9996],PARAMETER["false_easting",1500000],PARAMETER["false_northing",0],AUTHORITY["EPSG","3003"]]*
Now we need to modify this code in order to use it. We don't need to do complicated math operations for that. We simply add a new line which expresses the 3- or 7-parameter modification. (These parameters will be used for the transformation to WGS84).
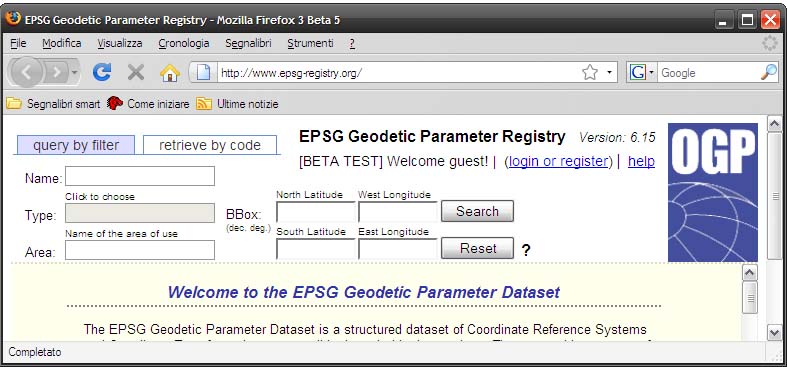
III) Then open the EPSG Geodetic Parameter Registry.
This registry contains coordinate transformations between different CRSs.
- On the Type box we check Coordinate Transformation and Single Only
- On Area we write Italy
And click on Search tab.
This search gives us 21 possible transformations between CRSs used in Italy. From Monte Mario to WGS84 are 10 transformations available. 1 on the mainland, 3 on the islands and 6 offshore.
Since we might need to do transformation on mainland the EPSG WKT code for this transformation is EPSG 1660 Italy mainland.
Click on the View tab.
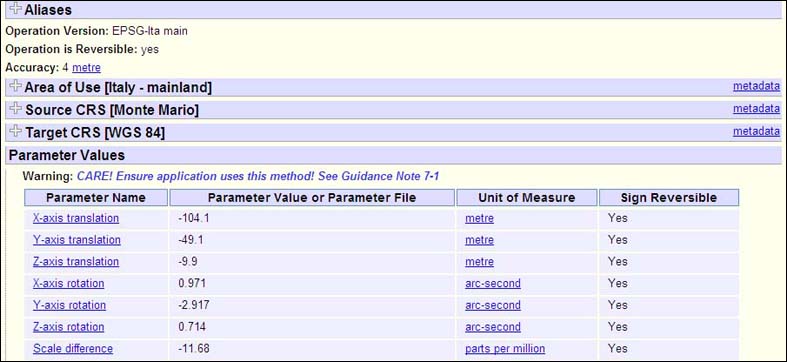
The new window will give us the desired Bursa Wolf parameters.
This new window contains 7 parameters (Bursa Wolf), because Monte Mario/zone 1 (EPSG 3003) requires 7-parameters to be correctly reprojected to the World Geodetic System 1984 (WGS84).
IV) Copy these parameters in your TEXT file in the EPSG code. This is the 3003 code modified with the 7-parameters modification:
PROJCS["Monte Mario / Italy zone 1",GEOGCS["Monte Mario",DATUM["Monte_Mario",SPHEROID["International 1924",6378388,297, AUTHORITY["EPSG","7022"]],TOWGS84[-104.1, -49.1, -9.9, 0.971, -2.917, 0.714, -11.68],AUTHORITY["EPSG","6265"]],PRIMEM["Greenwich",0,AUTHORITY["EPSG","8901"]],UNIT["degree",0.01745329251994328,
AUTHORITY["EPSG","9122"]],AUTHORITY["EPSG","4265"]], UNIT["metre",1,AUTHORITY["EPSG","9001"]],PROJECTION["Transverse_Mercator"],PARAMETER["latitude_of_origin",0],PARAMETER["central_meridian",9],PARAMETER["scale_factor",0.9996],PARAMETER["false_easting",1500000],PARAMETER["false_northing",0],AUTHORITY["EPSG","3003"]]*
Note the syntax (TOWGS84...) and the position of the 7 parameters in a WKT format.
V) Repeat the step for all the CRSs you need. Note that in your final TEXT file every CRS has to be a one liner, without any line breaks, like this:
PROJCS["Monte Mario / Italy zone 1",GEOGCS...
PROJCS["Monte Mario / Italy zone 2",GEOGCS...
PROJCS["ED50 / UTM zona 32N....
PROJCS["ED50 / UTM zona 32N...
PROJCS["WGS 84 / UTM zone 32N...
PROJCS["WGS 84 / UTM zone 32N...
GEOGCS["WGS 84......
(The last one is the CRS of the World Geodetic System that is used e.g. with GPS data)
At the end save the TEXT file with the name CS.CONF on your OpenJUMP/LIB/EXT folder. Congratulations: You just created a new set of CRS definitions that can be used for the reprojection of spatial data in Openjump.
VI) Many transformation defined by EPSG Geodetic Parameter Registry only require simple 3-parameter transformation (X, Y and Z translations. In this case the other 4 values (X,Y,Z rotation and Scale) must be set to 0.0 value on your TOWGS84 code (eg. TOWGS84[ -84.0, -107.0, -120.0, 0.0, 0.0, 0.0, 0.0])
NOTES:
- EPSG Geodetic Parameter Registry is a good place to start looking for Bursa Wolf parameters for transformation between different CRS definitions. Nevertheless, some of the translations that result from these parameters do not have a good accuracy depending the area of interest. Try to search the internet or other resources for the exact parameters for your area. One could be the Geoserver database.
- If you need a better accuracy to re-project a file, you must consider other solutions. One can be using the OpenJUMP Warping tool on some reference points, after doing the transformation.
Using the CTS extension with OpenJUMP
The following example explains how to use the CTS extension to do coordinate transformations in OpenJUMP.
I use a modified CS.CONF file for an Italian projection. You can find it at the end of this page with some other useful informations.
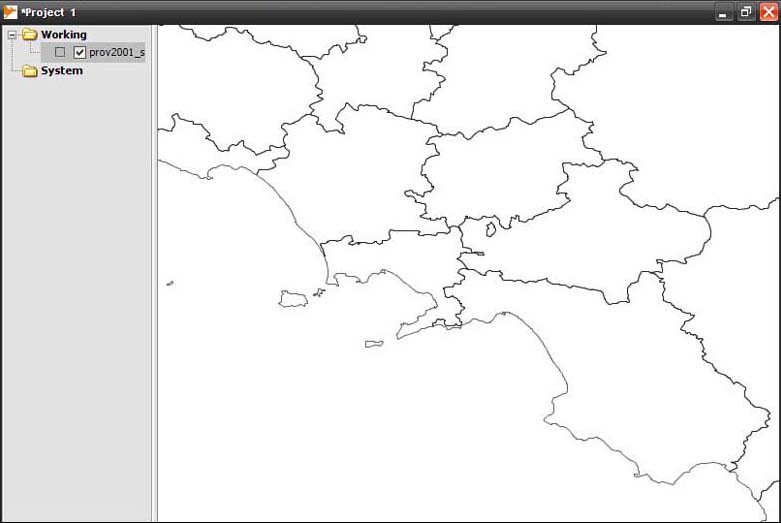
I start OpenJUMP and load the layer prov2000.shp showing the administrative borders of Italian Provinces: The CRS of this layer is WGS84 - EPSG4326.
First I need to assign this CRS to this layer. Neither OpenJUMP or the CTS extension are able to detect the CRS of the data that will be transformed.
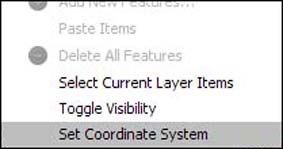
To do so I right-click on prove2000.shp in the Layer list and choose Set coordinate system from the context menu.
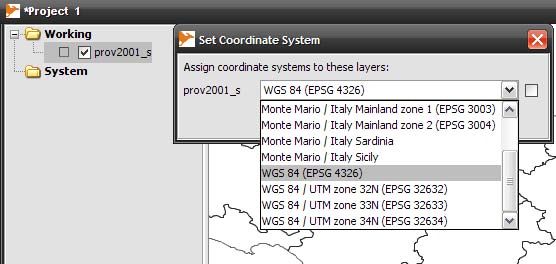
The projection dialog opens. From the drop down list for prov2000 layer I select WGS84 (EPSG 4326) to assign the correct CRS.
Then Click OK. This is the Target Projection.
Note that the checkbox on the right has to be enabled. If you only want to reassign a different CRS (e.g. wrong chosen earlier), simply disable the checkbox and assign another CRS. The checkbox will enable itself after the assignment.
Now I open the file campaniagb.shp. This file represents the extension of the municipalities in Campania Region (Italy). The original projection of this layer is in Monte Mario /Zone 1 - EPSG 3003 (Called informally Gauss Boaga 1 in Italy). As you can see on next figure, this new layer is not projected on the top of the data of prov2000 layer. You could find it far away if you zoom out, because at this point geometries in two different CRSs are displayed in one viewport.
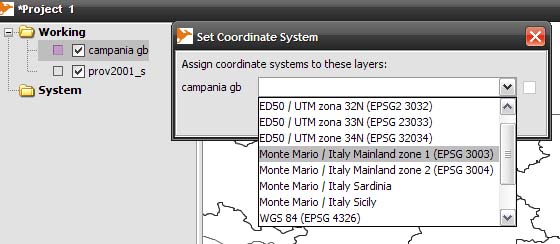
Now I set the correct CRS for the layer campaniagb.shp by choosing Monte Mario / Italy mainland zone 1 (EPSG 3003)
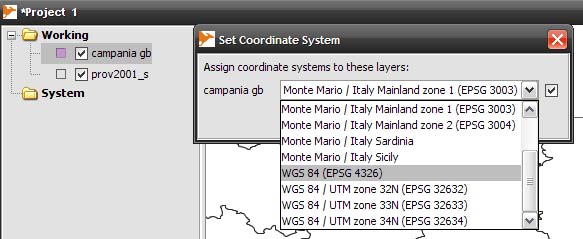
The next step is to click on Set Coordinate System again for the layer campaniagb.shp to choose the target projection, in this case WGS84 (EPSG 4326) (the projection of the other layer). For the layer campaniagb.shp the transformation on the geometries is started.
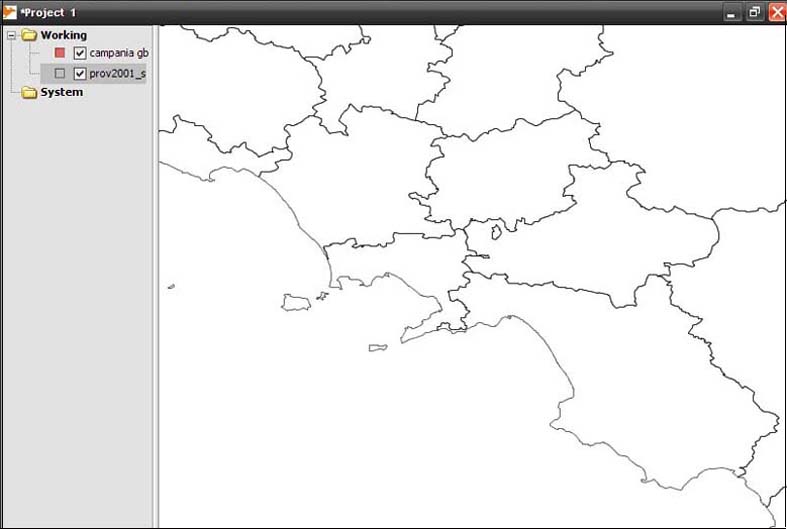
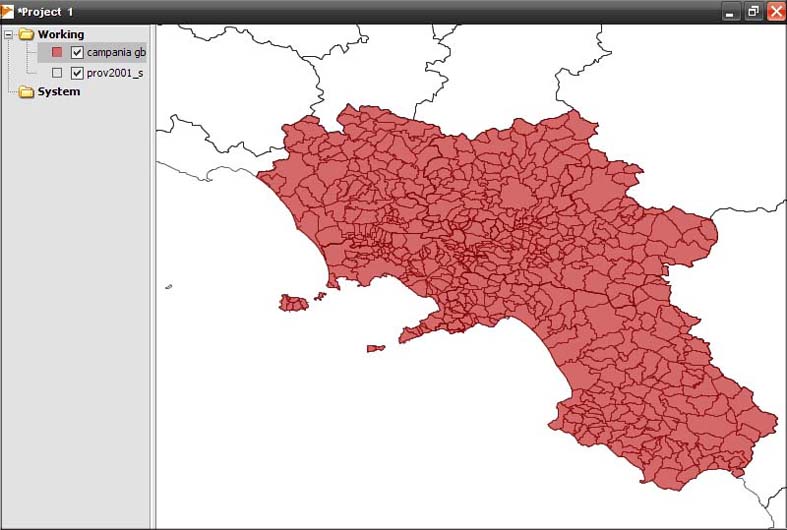
As the result of our efforts the layer campaniagb.shp is now correctly projected on the top of layer prove2000.shp.
NOTES:
- The reprojection works only when the small checkbox on the right is activated (which it gets automagically if a CRS is assigned). The user can assign a different CRS (e.g. wrong assigned on the first hand) by manually unchecking the checkbox and simply selecting another from the dropdown field.
- The re-projection action modifies the original layer. Be careful when saving layers since you might save the reprojected data without the intention to do so.
- You can transform more than one layer by selecting multiple layers in the layers list.
- The transformations are un-/redoable, because the old geometries are saved in the memory. This might cause problems with bigger datasets.
Download some CONF files ready to use
- CS.CONF. These files can be used with the following projections for Italy: WGS84, WGS84/UTM. ED50, Monte Mario (Gauss Boaga). Use it carefully since it hasn't been tested yet to the full extent.
References
- Edgar Soldin, - CTS extension, Mini Manual from Jump Developer List (English)
- Andrea Aime - Introduzione to Geoserver (Italian)
- Fmepedia - Bursa Wolf parameters definition. Safe Software Inc (English)
- Diego Magni - Operazioni su datum e coordinate Milano, Laboratorio di Geomatica (Italian)
- Moovida - How to find and use Bursa Wolf parameters for accurate coordinate transformation, posted on jgrasstechtips on blogspot (March 2008) (English)
- uDig - Bursa Wolf parameters (English)
- Wikipedia - Helmert transformation (English)
LINKS
- part 3 Using the CTS extension with OpenJUMP is also translated in Italian at GfossWIKI for Italian users
Giuseppe Aruta
back to Index page
