Editing Toolbox
back to Index or to List of Functions
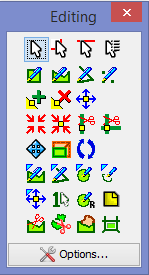
The Editing Toolbox is a collection of tools for editing, generating and modifying geometries on the Layer View. User can make complex drawings from basic elements, such as lines, circles or polygons. Features can be duplicated, modified or rotated
The Editing Toolbox is opened by selecting the Editing Toolbox tool on the Toolbar ![]() or from the Menubar>View list. To use the Editing Toolbox tools make sure that the working layer is editable.
or from the Menubar>View list. To use the Editing Toolbox tools make sure that the working layer is editable.
Note 1: if you open an empty project and select the Editing Toolbox tool on the Toolbar, a new layer is created both in editable and selectable mode.
Selection and Move Tools
These tools allow to select items and to move them
![]() Select feature tool: this allows to select items on the Layer View. This tool is also availble directly on the toolbar
Select feature tool: this allows to select items on the Layer View. This tool is also availble directly on the toolbar
- To select one item left-click on it.
- To select items in an area, left click and hold down drawing a rectangle on the area
- To select differet items in different area, press CTRL key and click on the items.
![]() Select a part of combined features: one or more items in a combined group can be edit using this feature
Select a part of combined features: one or more items in a combined group can be edit using this feature
- To select one item of a group click on it
- To select more items of a group, press CTRL key and click on the items.
![]() Select a hole: a hole in a feature can be selected. This tool is used to modify hole vetices or to move entire hole inside a polygon
Select a hole: a hole in a feature can be selected. This tool is used to modify hole vetices or to move entire hole inside a polygon
![]() Move selected features: This tool is used to move previous selected features, included selected holes.
Move selected features: This tool is used to move previous selected features, included selected holes.
Drawing Objects Tools
These tools are used to draw items on the Layer View.
![]() Draw a Rectangle allows to draw polygons in the Layer View.
Draw a Rectangle allows to draw polygons in the Layer View.
- To draw a Rectangle select Draw a Rectangle tool and draw a box on the Layer View, to stop drawing double click or right-click with mouse on the layer view.
![]() Draw a Polygon allows to draw polygons on the Layer View. It is also used to draw holes on a polygon.
Draw a Polygon allows to draw polygons on the Layer View. It is also used to draw holes on a polygon.
- To draw a Polygon select Draw a Polygon tool and click to place the vertices of the polygon on the Layer View, to stop drawing double click or right-click with mouse on the layer view.
- To draw a hole, select the polygon and use Draw Polygon tool to draw a hole on the top of the former. To stop drawing double click or right-click with mouse on the layer view.
![]() Draw a line allows to draw a linestring on the Layer View.
Draw a line allows to draw a linestring on the Layer View.
- To draw a line select Draw a line tool and click to place the vertices of the line on the Layer View. To stop drawing double click or right-click with mouse on the layer view.
![]() Draw a point allows to draw points on the Layer View.
Draw a point allows to draw points on the Layer View.
- To draw points select Draw a point and left-click to put the points on the Layer View. To stop drawing double click or right-click with mouse on the layer view.
TIP: You can delete the last vertex while you are creating a polygon or linestring clicking on BackSpace key.
Vertices and Resize Object Tools
These tools are used to add, delete, move vertices to features. A resize object tool is also available
![]() Add Vertex allows to add line points to features
Add Vertex allows to add line points to features
- To add a vertex to a feature, 1) select the feature, 2) select the Add Vertex tool and 3) add the vertex left-clicking with mouse on the line
![]() Delete Vertex allows to delete line points from features
Delete Vertex allows to delete line points from features
- To delete a vertex from a feature, 1) select the feature, 2) select the Delete Vertex tool and 3) delete the vertex left-clicking with mouse on it
![]() Move Vertex allows to move line points on features
Move Vertex allows to move line points on features
- To move a vetex 1) select the feature, 2) select the Move Vertex tool and 3) left click with mouse on the vertex and drag it
![]() Resize Features allows to resize feature or group of features on the Layer View
Resize Features allows to resize feature or group of features on the Layer View
- To resize features 1) select the feature, 2) select the Resize Feature tool, a red dotted line box is displayed around the selected features, 3) Drag a corner of the box to resize tge features.
Snap and Split Tools
These tools allow to set some functions, like merge vertices and split lines
- This tool is used a) to snap vertices of two polygons not overlaying or b) to merge two o more vertices in one polygon
- To snap vertices select the tool and draw an area which touches the 2 polygons.
- To merge vertices, 1) select the feature, 2) select the tool, 3) select the first vertex and drag it, while still pressing the left button of the mousse, to the second vertex
- To merge two vertices: 1) select the feature, 2) select Merge two Vertices tool, 3) drag a box around both vertices, 4) press the SHIFT key and click on the target vertex in the box.
![]() Split line: split a line on a point
Split line: split a line on a point
- To split a line: 1) select the line, 2) select Split line tool, 3) Click with the left button of the mouse to the split position.
![]() Split lines on intersection: split two intersecting lines on the intersection
Split lines on intersection: split two intersecting lines on the intersection
- To split two lines on the intersection: 1) select both lines, 2) select Split on intersection tool, 3) Left click with on the intersection
Drawing Constrained Object Tools
These tools allow to draw constraints features (see also Option...>Constraints).
- To draw a constrained polygon:
- Define the constraints parameters (See Constraints below)
- Hold on SHIFT on the keyboard
- Draw the polygon
- To draw a constrained line:
- Define the constraints parameters (See Constraints below)
- Hold on SHIFT on the keyboard
- Draw the line
- To draw a constrained circle:
- Define the constraints parameters (See Constraints below)
- Select Draw Constrained Circle Tool
- Hold on SHIF on Keyboard
- Left click on the view to place the centre of the circle
- Left click again to identify the radius
- Double click or right click to define the circle
- A triangle can be drawn to enclose the circle around three points
- To draw a constrained arc:
- Define the constraints parameters (See Constraints below)
- Select Draw Constrained arc Tool
- Hold on SHIFT on keyboard
- Left click on the view to place the centre of the circle
- Left click again to identify the radius
- Draw the arc around the radius
Other Tools
![]() Constrained move vertex tool allows to move a vertex depending on the constraints sets
Constrained move vertex tool allows to move a vertex depending on the constraints sets
![]() Rotate selected tool allows a free rotation of a selected feature. Hold the shift key down to specify a rotation point other than the center.
Rotate selected tool allows a free rotation of a selected feature. Hold the shift key down to specify a rotation point other than the center.
![]() Select one item tool allows to select an item. This is useful if the desired item is grouped with others
Select one item tool allows to select an item. This is useful if the desired item is grouped with others
![]() Draw a circle tool allows to draw a circle specifying the radius and the accuracy.
Draw a circle tool allows to draw a circle specifying the radius and the accuracy.
![]() Cut Polygon tool allows to cut one or more selected polygons. This tool allows also to create a cookie cut inside a selected polygon.
Cut Polygon tool allows to cut one or more selected polygons. This tool allows also to create a cookie cut inside a selected polygon.
![]() Auto complete polygon allows to draw a polygon outside another and completes the area inbetween them. This tool can be used also to fill a hole inside a polygon with a polygon island.
Auto complete polygon allows to draw a polygon outside another and completes the area inbetween them. This tool can be used also to fill a hole inside a polygon with a polygon island.
![]() Cut Features cut selected linear and polygonal geometries with a line. A line or a polygon can be split into 2 or more pieces. If a MultiLineString or a MultiPolygon is selected, it will be exploded even if it is not split. Cut features is undoable, but if selected features belong to several layers, several undo must be performed.
Cut Features cut selected linear and polygonal geometries with a line. A line or a polygon can be split into 2 or more pieces. If a MultiLineString or a MultiPolygon is selected, it will be exploded even if it is not split. Cut features is undoable, but if selected features belong to several layers, several undo must be performed.
![]() Note Tool allows to add notes to a map. The newly created layer "Notes" can be stored as point file.
Note Tool allows to add notes to a map. The newly created layer "Notes" can be stored as point file.
![]() Fill Polygon to fill the smallest closed area where the user clicked. Geometries must be correctly noded.
Fill Polygon to fill the smallest closed area where the user clicked. Geometries must be correctly noded.
Options...
The Options button allows to customize some drawing settings. In the Constraints and Snap/Grid options the unit is defined by the project unit. OpenJUMP 1.2 integrated here some functions from the ISA (Integrated Systems Analysis, Inc) tools. Some following notes are from the ISA plugin documentation
Constraints
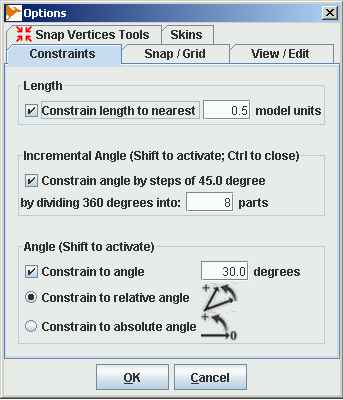
The dialog allows the users to set drawing constraints. For instance, by setting the lenght and incremental angle constraints, the users can draw buidings with exact 90 degree corners with lenght of sides at even 5 metres incremet. Edit selected side allows the users to modify the interior angle and lenght of polygons and lines after they are created
- length: constraints the lenght of the nearest identified unit. i.e. portion of foot or meter
- Incremental Angle: After drawing the first line, holding the shift will constrain the angle between the current line and the previous line to angle increments established by dividing 360 by the number you place in the box. The control key will constrain the angle to the first line. Shift key will active the command, Ctrl will close it
- Angle
- Constrain to angle: box where user can define the constrain angle
- Constrain to relative angle: After drawing the first line, holding the shift will constrain the subsequent lines to the angle placed in the Constrain to angle box, relative to the previous line.
- Constrain to absolute angle: While holding the Shift key all lines will be constrained to the angle placed in the Constrain the angle box, relative to zero degree.
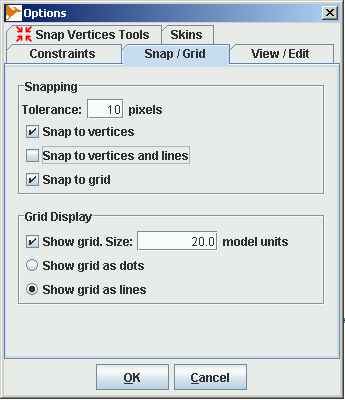
Snap/Grid
the dialog defines snapping and grid display
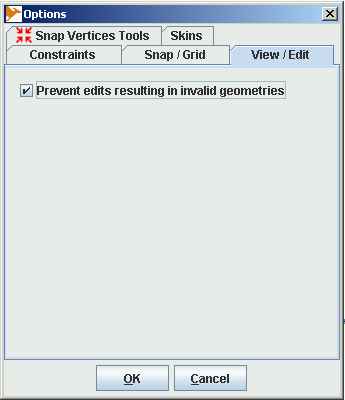
View/Edit
The dialog only prevents creation of invalid geometries
Snap Vertice tool
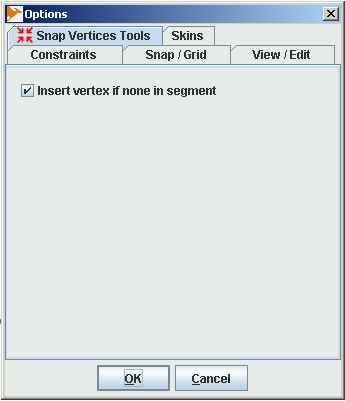
The dialog sets an option to create new vertices at snapping points of lines
Skins
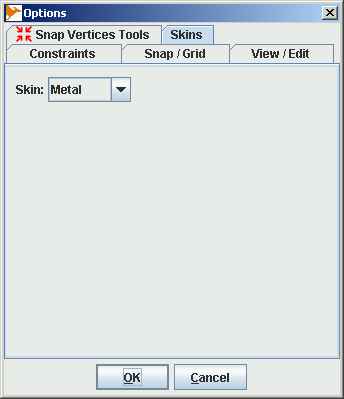
Users can define the layout of OpenJUMP, i.e. skins.
Note that some skins (motif or metal) may look ugly since they depend on the Operating System (Windows Vista or Linux Gnome environment). See FAQ no. 5 for further information about Gnome.
back to Index or to List of Functions
