How to create a jar plugin in ECLIPSE
Jump to navigation
Jump to search
If you have created your HelloWorldPlugIn like in the section How to make your plugin in ECLIPSE then you can use it by creating a jar library. This method is a good way if you want to deploy your plugin but is somehow a bad way for testing your plugin code on errors. For the latter case see this section: How to use a plugin with a properties file in ECLIPSE.
But let's start on how to create a jar file in Eclipse:
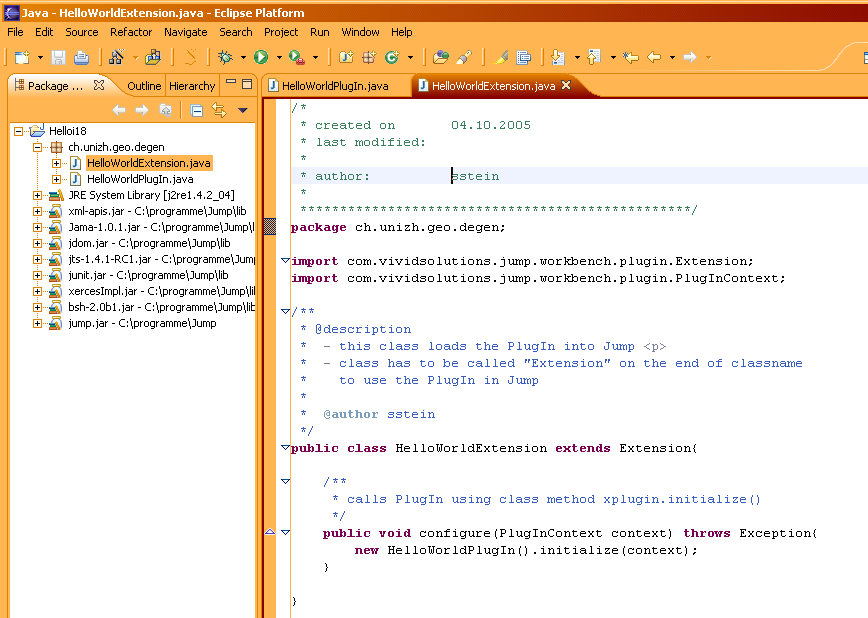
- 1 - First thing we have to do is create a Jump Extension class. Therefore we right-mouse-click on our Helloi18 project folder and create a new class HelloWorldExtension. The xxxExtension class is a class of type Extension which has to be realized by adding: extends Extension (see picture below)
- 2 - The class must hold a method called configure() which is called by OpenJUMP. In this method we put a line to call the initialize() method of our xxxPlugIn class.
Example code for the HelloWorldExtension class is given below.
/*
 * created on 		04.10.2005
 * last modified:
 *
 * author:			sstein
 *
 *************************************************/
package ch.unizh.geo.degen;

import com.vividsolutions.jump.workbench.plugin.Extension;
import com.vividsolutions.jump.workbench.plugin.PlugInContext;

/**
 * @description
 *  - this class loads the PlugIn into Jump <p>
 *  - class has to be called "Extension" on the end of classname
 *    to use the PlugIn in Jump
 *
 *  @author sstein
 */
public class HelloWorldExtension extends Extension{

	/**
	 * calls PlugIn using class method xplugin.initialize()
	 */
	public void configure(PlugInContext context) throws Exception{
		new HelloWorldPlugIn().initialize(context);
	}

}
Note: A number of different plugins can be initialized by one extension class. That means one can call several initialize() method from several PlugIn classes after each other.
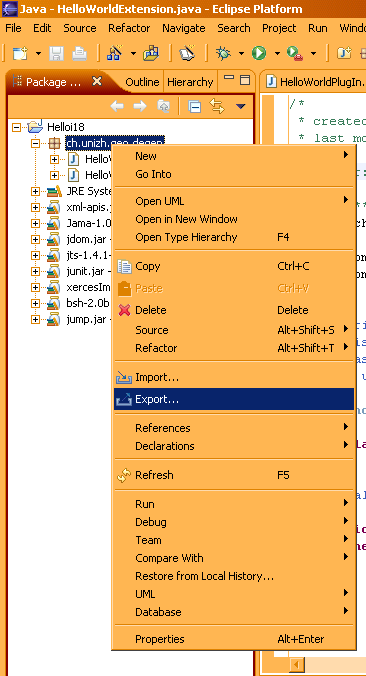
- 3 - Now we can create our jar library. Therefore right-mouse-click on your Helloi18 project folder and choose the Menu Entry Export....
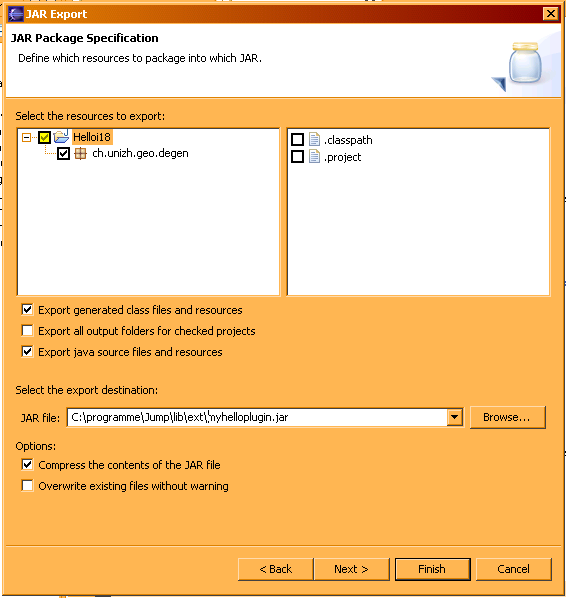
- 4 - In the following dialog select JAR file and click next. Now choose the options similar like I did in the screenshot below and specify the name and the path of your output file. Finally click on Finish
- 5 - As you see I have chosen directly the folder \openjump\lib\ext which is the final place if you want use the plugin. So if you create the jar file somewhere else then copy it into the \openjump\lib\ext folder.
- 6 - Afterwards start OpenJUMP. If you copy the jar file into the \ext folder and Jump is already running, then the new plugin will not be recognized - this happens only on program (OpenJUMP) start.


