How to run OpenJUMP in NetBeans
For OpenJUMP developement the Java SE Download Paket of Netbeans is enough. This article describe the code usage from the SVN repository.
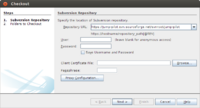
- In the main menu go to Team -> Subversion -> Checkout
- Repository URL:
http://svn.code.sf.net/p/jump-pilot/code
- Click "Next >"
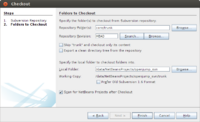
- Repository Folder(s):
core/trunk
(for the latest developer snapshot) or
core/tags/1.5.2
(for a stable version) or use the "Browse" button for an other diffrent version
- Select a "Local Folder" for the checked out code
- make sure that the checkbox "Scan for NetBeans Projects after Checkout" is checked!
- Click "Finish" and the checkout starts
- the progress can you see in the Output window
- After successfully checkout, NetBeans scans for a usable project and should ask you: "OpenJUMP svn snapshot project was checked out. Do you want to open the Project?"
Click "Open Project"
- NetBeans starts now automatically to scan and try to build the project. This may take a long time, because NetBeans must resolve, download and unpacking some of the Maven dependencies before. It depends on your internet connection and the performance of your hardware. You can see this in the NetBeans status bar on bottom of the window. Without this you cannot successfull build OpenJUMP.
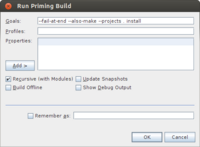
If the download and build not starts automatically, you have to start this manually. Click on the small Maven symbol in the statusbar and then "Run priming build in /data/NetBeansProjects/openjump_svn/trunk" in the ballon (see the picture above). It depends on the NetBeans version, your settings and if you have some previous downloads in your local Maven repository. In the "Run Priming" dialog you can simply press OK.
As you can see in the Projects Window, there are some problems. This are the Folders and files with an exclamation mark in the symbol. In this case not all external libraries (JTS for example) are downloaded. After successfull downloading all external libraries you can run OpenJUMP.
- Finally tell NetBeans some stuff for starting OpenJUMP
- Open the Project Properties window, click on the "Run" categorie:
- Main Class must be "com.vividsolutions.jump.workbench.JUMPWorkbench"
- and for the Plugins, you must set the Arguments to
-default-plugins scripts/default-plugins.xml
- Click OK
- Now you can start OpenJUMP with the green "Run Project" button on the toolbar
Nice coding :-)
Jammerhund 15:07, 18 March 2013 (UTC)


