Selecting Features
back to Index page
In OpenJUMP it is possible to select features in different ways.
Using Tools from the Toolbar
The main selection tools are available on the Toolbar
- Select feature tool
 - With "Selecting feature tool" it is possible to select one or more features by clicking on it. Using keyboards keys or mouse keys allows more accurate selection:
- To select more items in an area, hold down left-click and draw a rectangle on the area
- To select differet items in different area, press CTRL key and click on the items.on the Layer View.
- To avoids to clean the existing selection, hold on SHIFT key
Use Unselect tool ![]() to unselect items in the Layer View
to unselect items in the Layer View
- Editing Toolbox - Click on the Toolbar
 which opens the Editing Toolbox with more sofisticated editing and drawing tools. See Editing Toolbox wiki section for better explanation how to select a hole, a part of a geometry collection or a vetex.
Using Edit Menu
In the Edit menubar there are other selecting functions which allows to select items according to zoom and/or geometric shapes.
- To select all the items in one or more layer:
- select the layer(s) on the Layer List
- Click on Menubar>Edit>Select Layer Itams
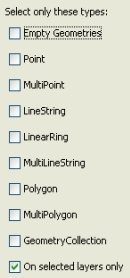
- To select items depending the geometry type.
- select the layer(s) on the Layer List
- Click on Menubar>Edit>Select by Geometry Type...
- On the new window choose the geometry type
- To select items inside a defined circle area
- select the layer(s) on the Layer List
- Click on Menubar>Edit>Select Items by circle from selected layer
- a new window will ask the user to define the radius of the circle
- The new window is displayed as a dotted red circle around the cursor. User has to pick on the Layer View the centre of the circle. All the items inside or touched by the circle will be selected
- Fence selection.
A fence is a temporary box that can be drawn on the Layer View. Fence are used to select iyems in a fence, to examine vertex of a feature and to zoom to a specific area enclosed by a fence. To draw a fence select the fence tool ![]() from the toolbar and drag a box on the Layer View to create a fence.
There are two functions to select items in a temporary fence:
from the toolbar and drag a box on the Layer View to create a fence.
There are two functions to select items in a temporary fence:
- Select features in fence in the Edit menu. This tool selects the features touched by a fence already drawn
- Select items by Fence from selected layer. User can drawn a fence on the layer and select the items inside
Using Tools Menu
The Tools Menu allows many operation on the features and their attributes displayed in the layer. Some of the Tools functions allows more sofisticated selection modes. The resaults are generally copied in new layers. Please see Tools section for other details.
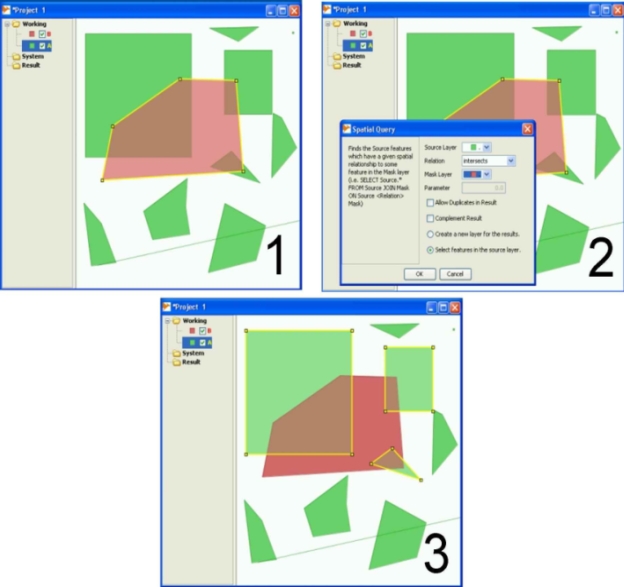
- To select features in tha layer A touched by a feature in the layer B.
- Select the features in the layer B
- Click on Tools>Querries>Spatial Querry and put Source Layer=A, Relation=Intersection, MaskLayer=B and choose Select feature in the source layer and click OK button
- In the Layer A (Source Layer) all the features intersected by the selected feature in the layer A will be selected
Using Edit Attribute View
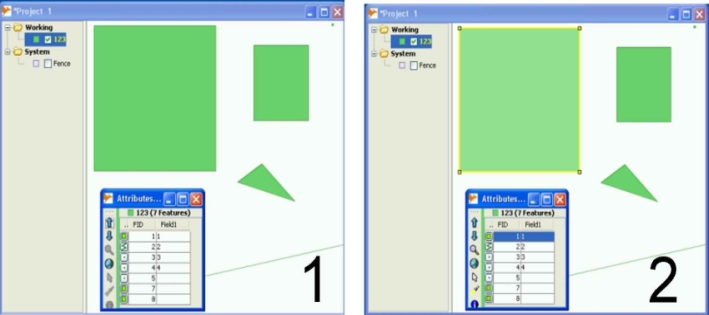
- Open the Attribute View
 on the Toolbar or in the Layer Menu of Layer List. The attribute view will show a table with all the items in colums (attributes) and raws (values)
 - Select in the table the raw of a feature and press
 just to the left of the table. The correspondending feature will be selected in the Layer View
It is possible to select more items (more rows) in the table
back to Index page


