Difference between revisions of "How to make your plugin in ECLIPSE"
Jump to navigation
Jump to search
(Created page with '== Making a JUMP / OpenJUMP Plugin == * 1 - Open Eclipse and create a new Java project using menu entry '''\file\new''' and select '''Project..''' * 2 - Now choose ''Java Projec…') |
|||
| Line 104: | Line 104: | ||
== Further Eclipse Example == | == Further Eclipse Example == | ||
| − | => For Eclipse i have done an example Project, which needs OpenJump or Jumpi18n core ([http://www.geo.unizh.ch/publications/sstein/openjump/eclipsehelloi18.zip download here). To use this in Eclipse: | + | => For Eclipse i have done an example Project, which needs OpenJump or Jumpi18n core ([http://www.geo.unizh.ch/publications/sstein/openjump/eclipsehelloi18.zip download here]). To use this in Eclipse: |
** download it and unpack. Put it into your Eclipse workspace folder | ** download it and unpack. Put it into your Eclipse workspace folder | ||
** use the following menu entry to load ''\File\Import\''. Select "Existing Project into Workspace" | ** use the following menu entry to load ''\File\Import\''. Select "Existing Project into Workspace" | ||
** after import don't forget to set the build path entries in the project properties. | ** after import don't forget to set the build path entries in the project properties. | ||
Revision as of 22:22, 18 October 2009
Making a JUMP / OpenJUMP Plugin
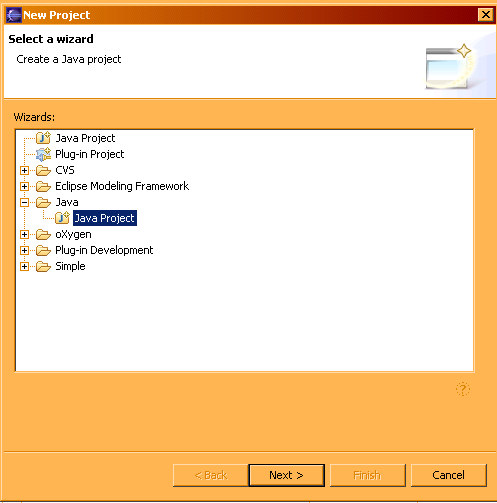
- 1 - Open Eclipse and create a new Java project using menu entry \file\new and select Project..
- 2 - Now choose Java Project
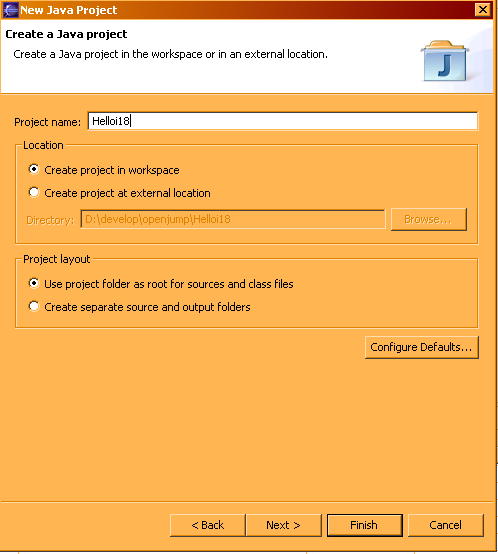
- 3 - Call the project for example Helloi18
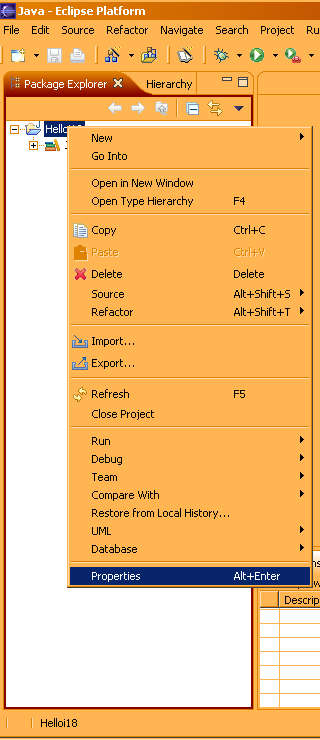
- 4 - Now we have created our new java project. But before we start coding we have to adjust some paths to register OpenJUMP methods so that we don't get error if our code is build. Therefore we need an installed Jump or OpenJump. Right mouse click on the project and select the project properties
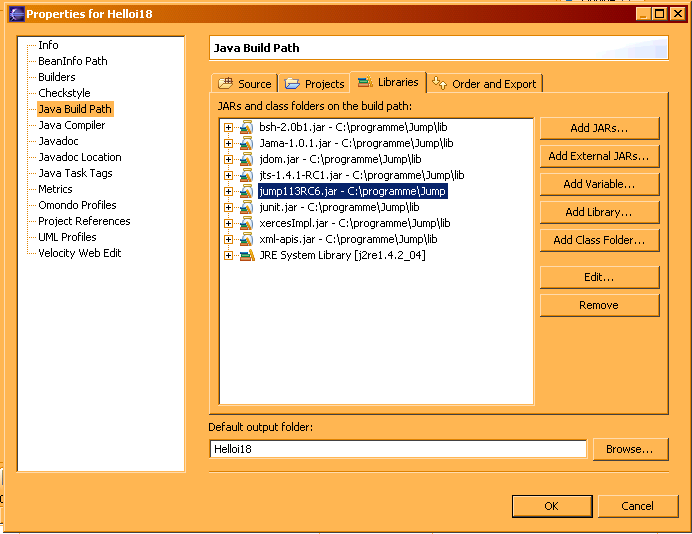
- 5 - Here we select on the left side the option Java Build Path and further the tab Libraries
- 6 - Now we add the necessary Jump core library by pushing the button Add External JARs
Therefore navigate to the folder where Jump is located and add the JumpXXX.jar by pressing Open button (note: xxx is used a placeholder for different names). Further navigate to the Jump subfolder Jump\lib\ and select the jar files which you find here in the same way. Finally press ok to leave the menu.
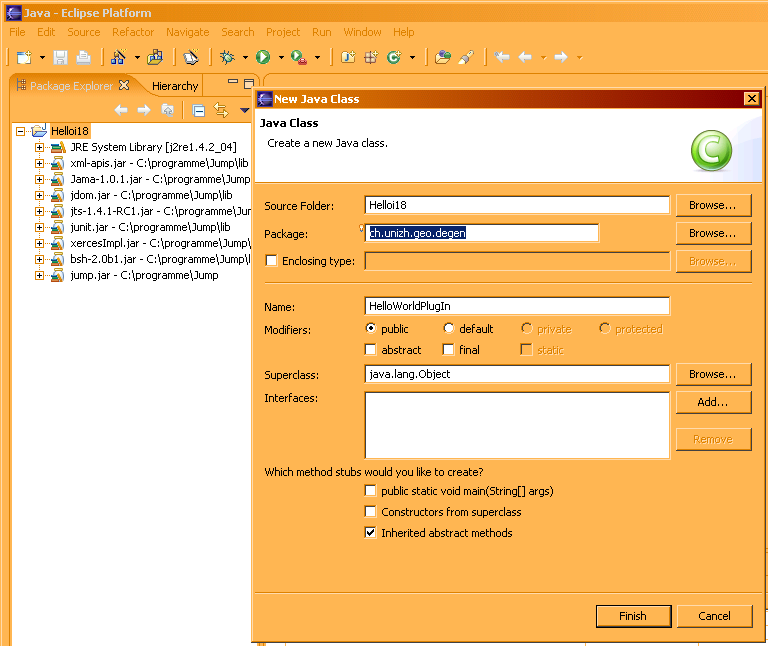
- 7 - Now it is time to create our plugin functionality. We right click on the project folder and select in the menu new the option Class. The following dialog appears:
- 8 - name the class for example HelloWorldPlugIn. But be aware of the following naming rules:
- for Jump plugins the class name must end with PlugIn
- Java Classes should start with uppercase letters
- Further you should create your class in a package or name space as i did using ch.unizh.geo.degen (see the picture)
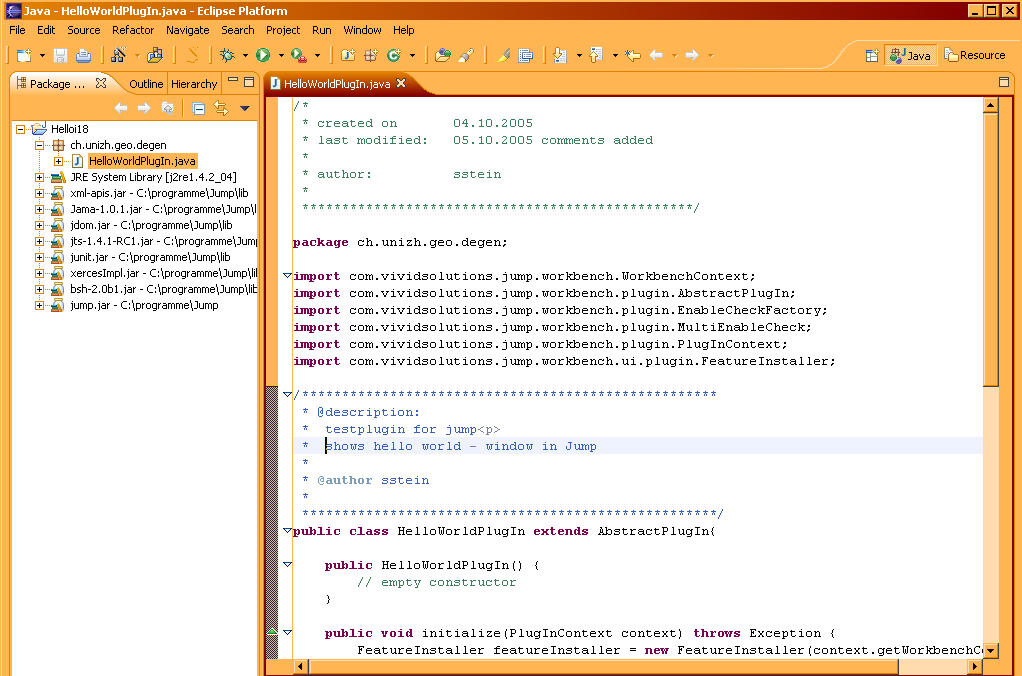
- 9 - Now we have to make our HelloWorldPlugIn class to a subclass of AbstractPlugIn by adding extends AbstractPlugIn (see Picture below). This is necessary since OpenJump requires in general two PlugIn methods to interact:
- the method initialze() is necessary to register and to create a menu item (for the example it is done in the View menu)
- the method run() contains the code which should be evaluated if the menu entry/button is activated. (see below)
- 10 - Finally after creating the class and adding implements. We can start to write our code. For this u can simply copy and past the code provided below.
/*
 * created on 		04.10.2005
 * last modified: 	05.10.2005 comments added
 *
 * author:			sstein
 *
 **/

package ch.unizh.geo.degen;

import com.vividsolutions.jump.workbench.WorkbenchContext;
import com.vividsolutions.jump.workbench.plugin.AbstractPlugIn;
import com.vividsolutions.jump.workbench.plugin.EnableCheckFactory;
import com.vividsolutions.jump.workbench.plugin.MultiEnableCheck;
import com.vividsolutions.jump.workbench.plugin.PlugInContext;
import com.vividsolutions.jump.workbench.ui.plugin.FeatureInstaller;

/**
 * @description:
 * 	testplugin for jump<p>
 *  	shows hello world - window in Jump
 *
 * @author sstein
 *
 */
public class HelloWorldPlugIn extends AbstractPlugIn{

	public HelloWorldPlugIn() {
		// empty constructor
	}

	public void initialize(PlugInContext context) throws Exception {
		FeatureInstaller featureInstaller = new FeatureInstaller(context.getWorkbenchContext());
		featureInstaller.addMainMenuItem(
				this,								//exe
				new String[] {"View"}, 	//menu path
				this.getName(), //name methode .getName recieved by AbstractPlugIn
				false,			//checkbox
				null,			//icon
				createEnableCheck(context.getWorkbenchContext())); //enable check
	}

	public static MultiEnableCheck createEnableCheck(WorkbenchContext workbenchContext) {
		EnableCheckFactory checkFactory = new EnableCheckFactory(workbenchContext);

		return new MultiEnableCheck()
		.add(checkFactory.createWindowWithLayerNamePanelMustBeActiveCheck());
	}

	/**
	 * Action on menu item selection:
	 * creates doc to show
	 */
	public boolean execute(PlugInContext context) throws Exception{

		context.getWorkbenchFrame().getOutputFrame().createNewDocument();
		context.getWorkbenchFrame().getOutputFrame().addText("Hello, World!");
		context.getWorkbenchFrame().getOutputFrame().surface();

		return true;
	}

}
How to make our code work will be described in the sections:
Further Eclipse Example
=> For Eclipse i have done an example Project, which needs OpenJump or Jumpi18n core (download here). To use this in Eclipse:
- download it and unpack. Put it into your Eclipse workspace folder
- use the following menu entry to load \File\Import\. Select "Existing Project into Workspace"
- after import don't forget to set the build path entries in the project properties.
